Nice to meet you, I’m Jasper Drescher, and I am part of the Programming team at Synapse Studio.
One of the first things I learned as a programmer is that good version control is essential to our work.
I would therefore like to share some insights into using Git in combination with Unreal Engine 5.
Projects in Unreal Engine 5 have a typical folder structure with assets and temporary or user-specific files. The “Config” folder is for configuration files for both the project and engine, the “Source” folder is for source code written in C++ and C#, the “Content” folder is for project assets and the “Plugins” folder is for all the plugins in your project.
The ”Intermediate”, “Saved” and “DerivedDataCache” folders however are for cache and local user files for your project, which can grow quite large and are not useful for other developers or long-term storage.

Using Git to control all this data makes it easier to work on your project with other developers or simply by yourself. In this article I’ll show you how.
Work-flow
Before creating a new Unreal Engine project you can use a Git client or Git Bash to create a local repository. In here you can decide to create a new folder to store your Unreal Engine project files, or simply use the repository as your project root along with all the Git files and raw assets like images. When you have created the project you can optionally connect your repository in the Revision Control window under the Tools menu in Unreal Engine 5.
Ideally you regularly fetch latest on the repository if you are collaborating with other developers. It’s also recommended to fetch latest before trying to commit your files to prevent mistakes when deciding how to merge your files in case of merge conflicts. The usage of branches is up to you and your team but it’s good practice to keep the amount of branches low keep the main branch up to date. If you are likely to share your repository with publicly or create binaries, then it can be useful to also create a stable branch that is tested regularly. Some Git hosting providers, such as GitHub, even provide support for automation to test and publish your features for a new binary release.
Trunk-based versus topic-branch development
When you decide to have more branches than working only in the main branch, it’s good to decide on a development strategy to stick to. This way you can keep your file changes organized and avoid common pitfalls while developing your project. Additionally, when you are collaborating with other developers, having branches with relevant names to compartment certain work will make it easier for the maintainers to organize commits to the main branch after a pull request and or review. A downside to this work-flow however is that the other branches can diverge a lot and introduce merge conflicts or a lack of feature integration without relying on a good strategy.
One of the straightforward approaches is to have a topic-branch or feature-branch approach to organize file changes and support smooth continues development. In this case developers can create a new branch with a relevant name every time they need to work on a feature. Such a branch usually exists for a long time and will not affect the main branch. It’s good practice to regularly fetch latest from the remote main branch to make sure that there is no divergence and that new features are properly integrated. When the file changes are ready to be integrated into the main branch it’s necessary to create a pull request. Using Git Rebase will also help provide useful commit history when the topic or feature branch is merged into the main branch. Git Rebase can show a more linear commit history with less merge conflicts, while Git Merge offers a more tree-like commit history by keeping the commit history of both branches.
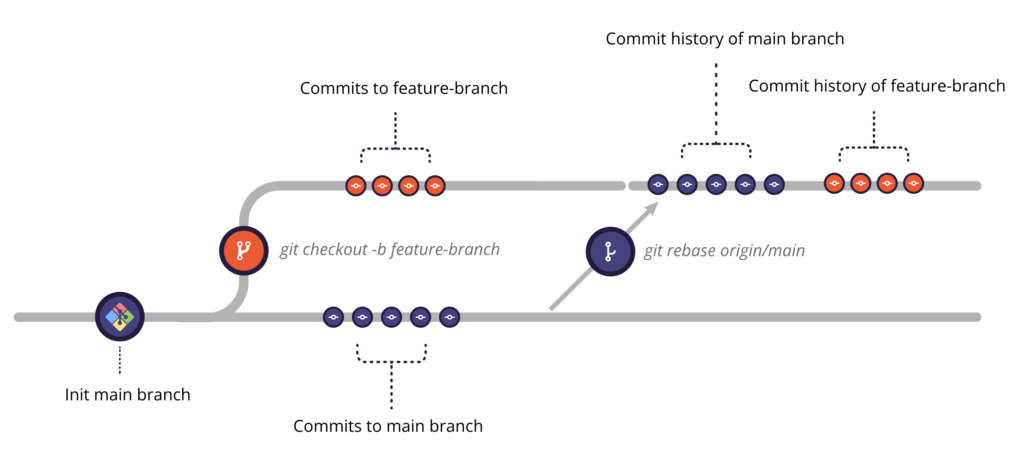
Trunk-based development is more centered around the main branch. By using small and frequent commits either on the main branch or a short-lived feature-branch, this strategy is best suited for developers who want continuous development on the main branch.
| Aspect | Trunk-Based Development | Topic-Branch Development |
|---|---|---|
| Branching strategy | One main branch with small commits | Multiple feature branches |
| Merge frequency | Continuously smaller merges | Less frequent large merges |
| Risk of merge conflicts | Lower | Higher |
| Collaboration style | Highly collaborative | More independent |
| Best for | Continuous delivery and rapid iteration | Large projects and complex features |
Git files
There are two commonly used files to control your Git repository. The attributes file, .gitattributes, and ignore file, .gitignore. They are usually put at the root of a Git repository, but you can have as many of these files as you want and put them in any sub-directories. For Unreal Engine, I recommend to simply put the files at the root of your repository or in the Unreal Engine project folder.
Using attributes for filepaths
To tell Git how to diff and control the files that we want to commit you can create a .gitattributes file. By default, using Git without LFS will be easier to set up and sufficient for smaller projects that don’t have large file sizes for assets. A typical .gitattributes file looks like this:
# Auto detect text files and perform LF normalization
* text=auto
As a general rule of thumb, a file that is larger than 100MB should be added using Git LFS, which is short for Large File Storage. Git hosting providers like GitHub have their own limits and pricing for this: About Git Large File Storage.
This is what the attributes can look like when using Git LFS:
# Auto detect text files and perform LF normalization
* text=auto

# Unreal Engine file types
*.uasset filter=lfs diff=lfs merge=lfs -text
*.umap filter=lfs diff=lfs merge=lfs -text
*.udk filter=lfs diff=lfs merge=lfs -text
*.upk filter=lfs diff=lfs merge=lfs -text
*.upack filter=lfs diff=lfs merge=lfs binary
*.ddc filter=lfs diff=lfs merge=lfs binary
*.locres filter=lfs diff=lfs merge=lfs -text
*.locmeta filter=lfs diff=lfs merge=lfs -text
*.ico filter=lfs diff=lfs merge=lfs -text

# Unreal Engine project files
Projects/**/Content/** filter=lfs diff=lfs merge=lfs binary
Projects/**/DerivedDataCache/** filter=lfs diff=lfs merge=lfs binary
Projects/**/Binaries/** filter=lfs diff=lfs merge=lfs binary
Essentially, we can control each how file changes for each filetype are treated. We can define which files should be treated as binary or text when diffing or merging changes. This also means that not every file needs to use Git LFS.
Ignoring files
To exclude files from your Git repository you can create an ignore file. There is a sample file on GitHub to ignore project files in your repository here: UnrealEngine.gitignore. The way that the paths in the ignore file are written makes it required that you put the .gitignore file at the root of the Unreal Engine project like this:
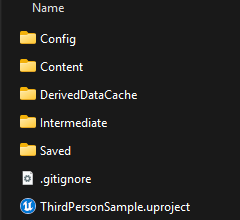
If you would rather have the ignore file at the root of your Git repository then you can change some of the paths by removing the wild card symbol “*” at the end, such as changing “Saved/*” to “Saved/”. If you want to add ignore more files or folders you can do so by adding them on a new line. I have made a few changes to cover more file types in this version:
# Visual Studio and VSCode user specific files
.vs/
.vscode/
.vsconfig
# Compiled Object files
*.slo
*.lo
*.o
*.obj
# Precompiled Headers
*.gch
*.pch
# Compiled Dynamic libraries
*.so
*.dylib
*.dll
# Fortran module files
*.mod
# Compiled Static libraries
*.lai
*.la
*.a
*.lib
# Executables
*.exe
*.out
*.app
*.ipa
# These project files can be generated by the engine
*.xcodeproj
*.xcworkspace
*.sln
*.suo
*.opensdf
*.sdf
*.VC.db
*.VC.opendb
# Precompiled Assets
SourceArt/**/*.png
SourceArt/**/*.tga
# Binary Files
Binaries/*
Plugins/**/Binaries/*
# Builds
Build/*
# Whitelist PakBlacklist-<BuildConfiguration>.txt files
!Build/*/
Build/*/**
!Build/*/PakBlacklist*.txt
# Don't ignore icon files in Build
!Build/**/*.ico
# Built data for maps
*_BuiltData.uasset
# Configuration files generated by the Editor
Saved/*
# Compiled source files for the engine to use
Intermediate/*
Plugins/**/Intermediate/*
# Cache files for the editor to use
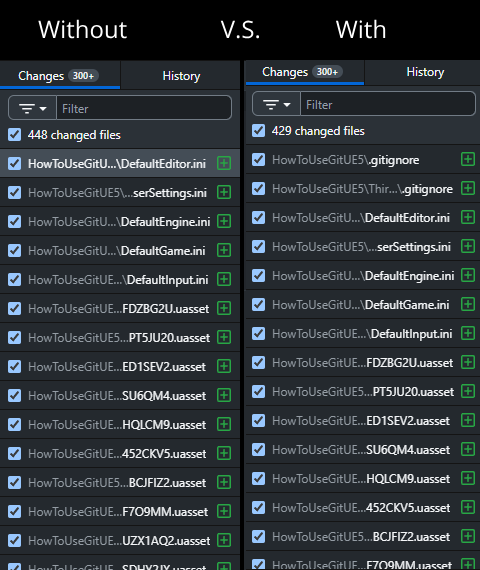
DerivedDataCache/*In the case of the Third Person Template with Start Content in Unreal Engine 5, simply adding an ignore file reduces the file changes from 448 to 429.
Some of the ignored files are in the “Intermediate” folder for example:

To run these commands you’ll need to have Git installed locally, and open your Command Prompt or Git Bash at the root of the Git repository or navigate there.
How to use Git LFS
If it’s your first time using Git LFS then you can download it from Git LFS. When the Git extension is installed you can open Command Prompt or Git Bash and run “git lfs install” once for your account. This will enable the use of Git LFS. You can then either manually use Git commands like “git lfs track “*.jpg””, or add it to an existing .gitattributes in your repository, to track file changes of all “.jpg” files in a repository using LFS.
Configuring Unreal Engine for collaboration
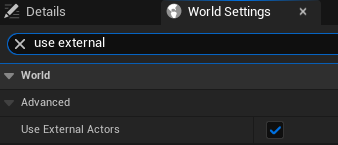
There are a few easy changes you can make to your Unreal Engine project for smoother collaboration with other developers. One of them is to enable One File Per Actor, or OFPA for short. If you are using World Partition, OFPA is enabled by default. You can enable OFPA in the World Settings of your project. When you enable OFPA you’ll have to set that for each level and sub-level where you want to have external actors.
Doing this will create new external assets for each actor. These new assets have encoded file names which look like this:
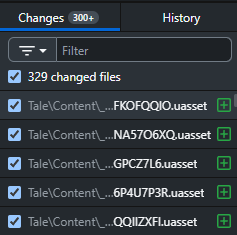
To view which asset has changed you can enable Revision Control in Unreal Engine under the Tools menu. When you open the View Changes window, you’ll be able to see each asset. You can then decide to keep committing file changes using a Git client like GitHub Desktop, or commit changes from within Unreal Engine.

Tips
Lastly, I have a few tips that may be useful to you while working with Git.
How to ignore existing files
To ignore files that were already committed to your git repository, you can remove them from Git without deleting them locally by using the following Git commands:
git rm --cached pathToFile
git rm -r --cached pathToFolder
How to change the case of a file
By default Git is configured to ignore cases in file names. This means that when you change the capital letter in a filename, it will be ignored. In order to make Git case sensitive you can change your Git configuration using this command:
git config core.ignorecase falseYou can also move your existing file in order to rename it or change the capital letter using this command:
git mv relative/path/to/FileName relative/path/to/filename